How to Create Spaces in Bluebeam Revu
You can add Spaces to organise and differentiate your markups in Bluebeam Revu. In this step-by-step guide, we'll help you learn how to create and use Spaces in Revu 21 and streamline your workflow & boost productivity.
Create Spaces in Bluebeam Revu
To create Spaces in Bluebeam:
Step 1 – Click on the “Spaces” Panel.
If your Spaces panel is hidden, right-click on the Panels bar, hover your cursor over the “Show” option and click “Spaces” to make the Spaces panel visible.
Step 2 – In the Spaces panel, click on the “Add Space” icon at the top. Click-Drag-&-Release to draw a rectangular selection or add individual anchor points for irregular Space selection.
Note: You can create nested spaces by adding more Spaces within the Space, allowing you to get even more granular with your organisation.
Step 3 – Once you are done with selecting the region for your Space, you'll be prompted to name your Space in Add Space Dialog box. Name your Space and click “OK”.
Your Space will be created and added to the Spaces panel.
Spaces Options
At the top of the Spaces panel, you can turn ON the option to highlight space(s) on the document.
You can also edit “Spaces” by clicking on them in the Spaces panel.
This will highlight the space and show the yellow transformation handles when you click on the Space, allowing you to edit the size and shape of your space.
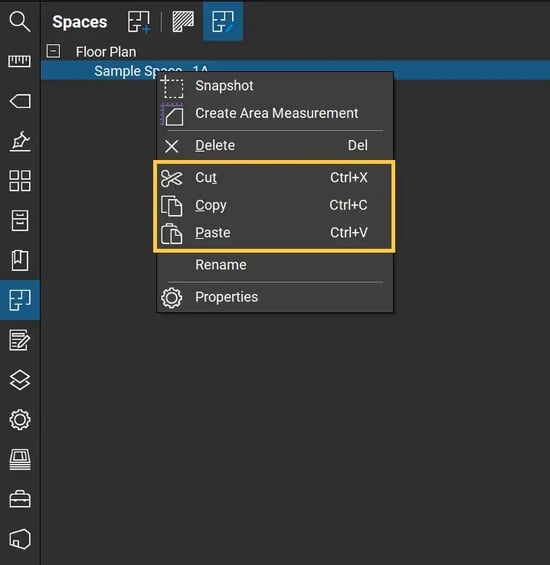
Right-click on a space within the Spaces Panel and you find more options like Snapshot, Create Area Measurement, Delete, Cut, Copy, Paste, Rename, and Properties.
The “Snapshot” option creates a direct copy of the region the space occupies and keeps it connected as a space.
You can paste this Space on another page to make it easier to markup while doing a punch walk.
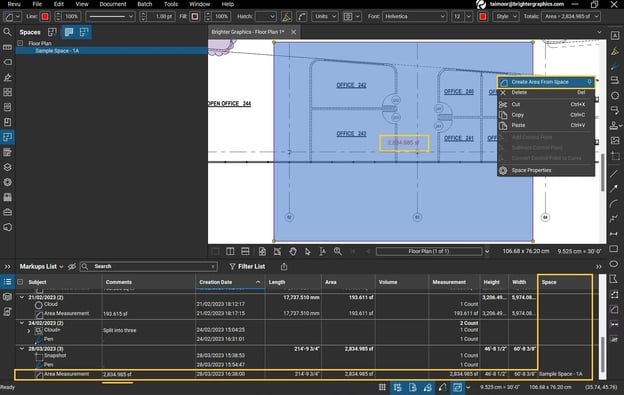
You can measure area by making a right click directly on the Space you created or its name under the Spaces panel. Then, click on the “Create Area Measurement” option.
It will measure the area for the region selected under the respective Space based on the scale set for the drawing. It can save you time by eliminating the duplicate effort of creating a separate area measurement of the Space and making sure it is accurate to the Space you have created.
Learn more about how to calibrate your drawings in Bluebeam Revu.
Next, there are multiple actions you can find for any markup like “Delete”, “Copy”, “Paste”, and “Rename”.
Spaces Properties
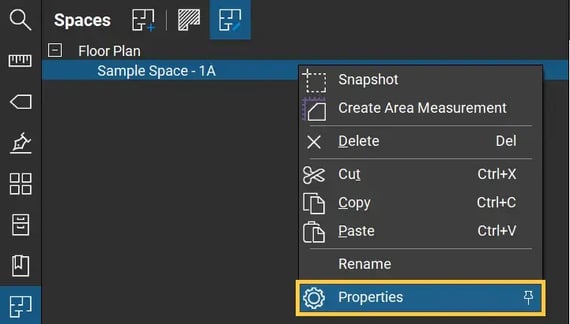
Another important option is “Properties”.
There are only three properties you can customise for your space. That is the Name, Colour, and Opacity of the space.
For instance, if you change the Space Colour to “Yellow” and Opacity to “30%”, it will turn into the following visuals.
Once you have your space(s) set up, you can use them as a filter in the Markups List, or in reports to be clear about where the markups you added are located.
Now you have a rich idea about how to create Spaces in Bluebeam Revu 21. Use this practical feature and unlock the hidden potential of PDF collaboration with Bluebeam Revu 21.
Exceptional Partner Support
Brighter Graphics is the Sapphire Partner of Bluebeam Revu, offering comprehensive support for all things related to Bluebeam. Whether it’s onboarding or technical support, Brighter Graphics is your go-to platform with an extensive library of resources, how-to guides, video tutorials, and training. Explore our Resource Center to make your journey with Bluebeam in AEC seamless.
Experience the Bluebeam Difference
Join the thousands of professionals who have transformed their project management experience with Bluebeam. Bluebeam allows you to easily navigate your projects, collaborate efficiently, and confidently make impactful, data-driven decisions.


